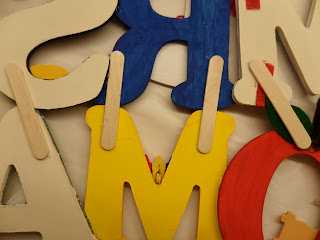
These pictures are no fun to look at, simply mechanics, but the best is saved for last!!
Here are some of the little details. I do not have pictures of how long it took me to assemble, but of course as you play with your letters, you will figure it out. It doesn't have to be straight! Don't forget to paint the back of the letters first, makes things easier! Here is a great place to buy letters online, if the craft store doesn't have the amount or the kind you want.
The assembling of the letters is the trickiest part. Overlapping the letters depends on the design of each and which one should be showcased, (in my case the Rag Doll letters.) I assembled the letters and hot glued the ones that went in the center, top to bottom and reinforced them with miniature popsicle sticks on the back. Once I laid them out how I wanted, I traced the part of the letter that went "over" so I could put hot glue in the right place.
Then I marked the 2 places in the middle of the sign and I screwed in an eye hook and tied a ribbon for hanging.
Here is the finished product when Andy's shirt was plain! I used red/white checked ribbon. Perfect!
Here it is when I made Andy's outfit more "authentic." Eh? Sometimes finished products should be left alone?
One reason this sign was a joy to make and a success is that the teacher has a constant theme in her room, not to mention what an absolute doll she is already. It's really no fun for me, to make the same of everything. I always have to challenge myself to create something new, different, out of the ordinary in some way. I like to figure out how it HASN"T been done. This notion really drives me. I ask "why not?" and "who said?" You know that kind of thinking could really get someone in trouble...
So, really, tell me what you think? Which letter is your favorite?


Hi Elaine,
ReplyDeleteI was very excited to find out I was the lucky teacher you were making that for. Its adorable and extremely creative I cant wait to add it to my collection. (:
Adriana :*