Vacation in a Box Complete!

First of all, let me just say that even after seeing and handling the box almost everyday, moving it here and there around my Craft Corner area, I overestimated how much I could actually put inside it.


Secondly, in case you did not know, Sanibel is the Sea Shelling Capital of the world, not Cape Hatteras, so there goes the "shelled" paper idea. Since the box has a really nice "linen" type base through which you insert pins to hold the photos, ephemera etc.., I left the background as is. It serves as a nice contrast with the grey frame and other "cool colored" pics I added. As art would have it, omission is sometimes necessary. Some of the pictures never made it on there, partly because I didn't want to cut them, I rather overlap.

The BIG picture.

The inaugural item for the shadow box was a doodle I worked on while I planned the vacation. Then I fiddled with the layout of the photos and figured out how to integrate a map of the area.  I thought this was imortant because we did quite a bit of traveling up and down the Outer Banks; then a Hurricane hit later that summer, and sliced through that, now familiar, strip of road. 


After much trial and rearranging, I finally had the layout how I wanted it, but I had to cut out the map. Apparently, I subconsciously arranged the pictures in order from North to South to show a glimpse of each area we visited. When I super imposed the map over the photos, it fell right into place, I was pleased. Being a stickler for details, I like for the documentation of a trip, such as this, to be as authentic as possible, it's the librarian in me. : )

A doodle, of the forthcoming vacation rendered last spring at a faculty meeting.

                                                                                                          
Wild horses on the beach, DO NOT DISTURB or you'll be fined!
Cape Hatteras light house, view of Pamlico sound, from the balcony.

Here is the map that runs through it, pretty much aligns with the location
 of the photos, except the horses, I had to hand write that town
as it was on the very northern tip of the island.


These are famous wooden fences, their purpose is to trap the constantly shifting 
sand to preserve the dunes and prevent beach erosion.

One of many boardwalks along the highway for beach goers,
and kite boarders. Swim at your own risk: no Life guards,
lots of wind and wild surf.  Brrr, that water is cold!

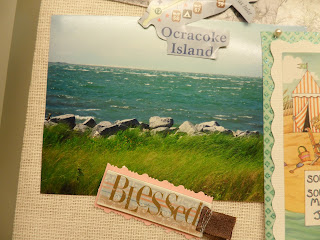
An amazing ocean view from an empty lot on Ocracoke Island,
which we explored by golf cart. This island was home to BlackBeard the Pirate.

Once that was finished, I added some color with "beachy" embellishments and a thought reading from top to bottom, can you read it? It says "We are Blessed,"  and we are.  My favorite part is the mounted illustration at the bottom by Mary Engelbreit, and the quote "Sounds of the wind, and sounds of the sea, make me happy just to be." By June Polus.  That really should be my motto, mantra and motivation in life!


Just for your information, below is the footprint left on the Outer Banks by Hurricane Irene, 2011. the Outer Banks usually has the Sound on one side and the Atlantic on the other, you will notice however that there is water all across the land thanks to Mother Nature.

Comments

Popular posts from this blog

Christmas in July - "All I want for Christmas" Wall Hanging

It's here! The Christmas in July Blog Hop has started and I am stop #3 on the hop, so make sure you see what Amy and The Patchsmith have made so far.     I love a charm pack, it's a tiny sampler of a great fabric collection! I'd like to show you how to make this whimsical door or wall hanging for Christmas, it's an easy pattern to repeat with any Charm Pack.      What you will need besides fabric, sewing machine & thread! 1 Charms Square pack 2 Fat Quarters that coordinate with your charms and applique graphic Backing Fabric Lite Seam to Seam for applique (2-3 sheets) or whatever other fusible product you like Embellishments like buttons, Rick Rack or ribbon (depending on your project) Neutral (white) 2 1/2" strips for borders (4)   The  finished size is about 12" x 36" unless you add more sashing or borders.     The first thing you do is unwrap your charms pack and lay out all the squares. You will i

Friday Night Block Party: Pinwheels

Welcome to the Friday Night Block Party here at Summercrafter.  If  you missed the first one , don't worry there's another one today!  Every Friday I will be featuring a new quilt block and the name or names associated with it and a little history.         Today's featured block is the called the Pinwheel. (It's on the button above!) I love it because it means fun! It makes me think of ...       Ferris wheels     and cartwheels  and wind. The Pinwheel block, was created in the United States around the 1800's. It became a very popular quilt block pattern and continues to be used in a variety of styles. There are so many ways to accent the "blades" with the colors (light/dark) patterns and placement, both within and around a quilt.  And it's really not a difficult block to do, I'll show you three different kinds of pinwheel blocks to try. Look at mine. I was happy go lucky as I pieced all these pinwheel blo

Five Happy Pumpkins!

Welcome to my day of the FALL BLOG HOP hosted by Sheri at Sunshine in the Attic . Below is the schedule of other bloggers in the hop: September 19th  Sheri --  Sunshine in the Attic  September 20th Maggie --  Maggie's Empty Nest Days September 21st Susie --  Susie's Sun Room September 22nd Celine  -- Espritpatch   September 23rd  Yevette --  Evindie September 24th Judy --  Judy's Fabric Addiction  September 25th  Elaine -- Summercrafter   September 26th Patricia --  Quilting Lines Do pop over check out what they made, as for me? I have a  fixation with the Five Little Pumpkins Song.  It's been part of my teaching repertoire for many, many years.  So here is my latest rendition I am calling it Five Happy Pumpkins. It's really easy to do, it does involve some applique but it's as easy as "cut and paste!"   Updates in yellow! These squares started out at 3 inches. Draw a diagonal across from co