
First, I must beg your pardon as I overlooked the date (15th) for the Christmas Once a Month posts as outlined here at Julie's blog. I don't know now if I'm ahead or behind?
 In any case, I do hope this project will make up for my oversight. I have had this pattern on my mind since I first worked with half square triangles on this project. I am happy to say this is one of my own inventions, as I did not use any pattern. Yay! I started with a clear idea and made the rest up as I went along!


Some people collect scraps for a giant scrappy quilt, I prefer more immediate gratification by making something more compact in a fraction of the time! Truthfully, finishing something (like a quilt) gives me great satisfaction and a sense of accomplishment I don't get doing other things; I'm addicted!
One perk was that I did it entirely with leftovers: Squares, 5 inch charms and smaller 2 1/2 inch squares, various strips and yardage I had from another project.


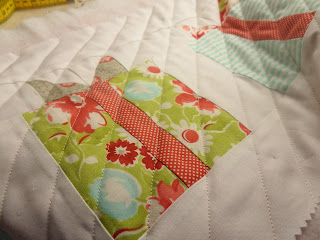
I cut the small squares in half after stitching them together with white counterparts. These will be the "bows."


The charms I just cut down the middle, then cut another charm square in equal strips. Which will serve as the "ribbon" around each present.

The plus side is the "ribbons" all match and there was no waste. The down side is that they came out to a 3/4 inch wide which made piecing the top strip nightmare-ish because doing math with half of a fraction is just way too challenging! TIP: Use whole and half numbers. : )

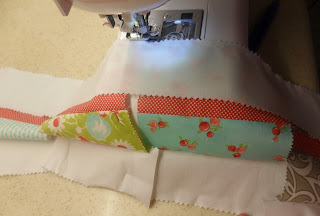
A quick way of putting it together was this easy "sew to a strip" technique I learned on Craftsy which was fast and fun. Connecting the top strip was the one little glitch that gave me the perfect opportunity to try out a "partial seam" technique I also learned in the same Craftsy class, the BOM 2013 with Laura Nownes. Let's keep learning!

See, I attached the "bows" first then the rest of the top strip incrementally.

See, not too shabby or difficult.

I was running a little short of the recommended amount for backing fabric guidelines (3-4 inches on each side.) But I just had to take the chance because it was the perfect complement to the front and it was a scrap piece.

Prepare for quilting: I really wanted to stay with a linear pattern for the quilting, following the "bow" lines seemed logical. Confession: I eyed it, okay?

For the binding, I really wanted some green but I stuck to my guns about using scraps....

It's a simple tiny runner of Pretty Presents, can you tell? ; ) About 10 x 26 inches.

and even though it's not Christmas fabric,

it's got the "feel."

And it's fresh and modern!

It also made a perfect Teacher Appreciation gift in the middle of May!
Thanks Mrs. Urgelles!

and even though it's not Christmas fabric,

it's got the "feel."

And it's fresh and modern!

It also made a perfect Teacher Appreciation gift in the middle of May!
Thanks Mrs. Urgelles!
Oh, Elaine - this is just the most delightful table runner ever! I love the design, the fabrics, and the quilting grid! Happy, happy, happy! So sweet of you to share your "gifts" with others who share theirs!
ReplyDeleteThat is the cutest table runner I've seen! It's perfect for the holidays and I am totally going to make one with that same fabric! Thank you for joining the Christmas Once a Month Party!
ReplyDeleteJulie @ The Crafty Quilter
I love this! especially your 'crafty' bows...very clever.
ReplyDeleteI would really like to try this runner, is there PDF File that I can print and take to my sewing machine? or do I need to write this in long hand ?
ReplyDeleteHi "Anonymous" I am working on getting tutorials or patterns into PDFs (that's one of my summer projects) feel free to print out the post. Or send me your email and I can send you the instructions.
ReplyDeleteThis is so cute!
ReplyDelete