I think the color orange shouts "look at me," it's like when someone sneaks up behind you and startles you --but you are happy to see them. Combining a color scheme in a design takes a lot of thinking, especially when I am also figuring out the design. And while I have heard it said that quilting is time consuming, I think the planning takes the most time, it's so much math!! The truth is, as a beginning quilter, I have yet to follow a pattern. I have "invented" my handful of projects on my own because I thought is was easier, what was I thinking?
 |
| Size about 12 x 36 inches |

 First, I started with a charm pack (about 30 precut 5 inch squares) the collection was "Spooktacular" by Sanae for Moda Fabrics (sorry no longer available). For me the design and color schemes really play off each other. Seeing the colors and patterns laid out, almost sorts itself out in my mind with automatic deletions and combinations that work well together. Below are the three main blocks of the design, everything else became a border element.
 For the top square, I cut out the shape of a cat face, ironed it on with fusible interfacing, same for ears and nose. The eyes are buttons, the whiskers and mouth are stitched. I just quilted in shadow/echo fashion around the outline of the cat.
For the bottom square, I cut out a Frankenstein face by making a green rectangle and a small black rectangle piece at the top for hair and sideburns. I used black Ric-Rac for the spiked hair effect. : ) I love that part! I stitched the scar with a special embroidery stitch from my new sewing machine, Audrey. Buttons for eyes and nose, scrap mouth stitched over with a blanket stitch.

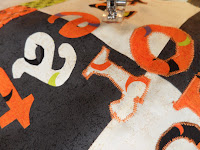
 For the center, that was just black and white, I spelled out trick or treat in contrasting colors and patterns from the charm pack. I ironed them on, using fusible interfacing and sewing a zig-zag stitch around each letter, see photo on right. The quilting pattern for this block, if you will notice, is a spider web pattern.
My friend hangs this on her door, inside or out, for Halloween. I think the best feature is that it's washable in case sticky fingers come in contact with it.


Comments
Post a Comment
Everyone enjoys a fitting reply; it is wonderful to say the right thing at the right time! Proverbs 15:23. I"m all ears!